Please Note: This article is written for users of the following Microsoft Word versions: 2007, 2010, 2013, 2016, 2019, Word in Microsoft 365, and 2021. If you are using an earlier version (Word 2003 or earlier), this tip may not work for you. For a version of this tip written specifically for earlier versions of Word, click here: Understanding Styles.
Written by Allen Wyatt (last updated April 16, 2022)
This tip applies to Word 2007, 2010, 2013, 2016, 2019, Word in Microsoft 365, and 2021
Unlike most other word processing programs, Word does an excellent job of separating content from appearance. This may sound strange, but the words you type are your content and the way they look on screen or on paper is the appearance. Styles are nothing more than a named definition of how text should appear. You can best understand this by comparing your text to water (this is your content). The appearance of the water depends on the attributes of the container in which it is placed. If you place it in a glass it will look one way; if you place it in a pitcher, it looks a different way. The relationship between text and styles is no different; if you change the style that has been applied to text, then the appearance of the text automatically changes.
While Word allows you to explicitly format your text by selecting it and then picking the attributes you want applied, styles give you much more power. This is because you only need to define the style once and then you can apply it to text as you see fit. Plus, if you later change the style, all text formatted with that style is automatically updated to reflect the change. (You have changed the container, so the water changes appearance.)
The two most prevalent style types in Word are Character styles and Paragraph styles. Character styles are used to define how individual characters appear, including attributes such as font, font size, and bold, italics, superscript, etc. Paragraph styles are much more comprehensive and define not only how the characters in the paragraph appear, but how the paragraph should appear in relation to the margins of your document, whether it should include bullets or numbering, how it should be treated by the spelling and grammar checkers, and how it should appear in relation to other paragraphs in the document.
In addition to character and paragraph styles, you can also define table and list styles. Table styles are used to specify how a particular table appears, including borders, spacing, and other table-specific formatting attributes. List styles are used to define how bulleted lists and numbered lists should appear.
Styles are saved with a document, or they can be stored in a document template. Word allows you to add, change, rename, and delete styles. Follow these steps to define a style:
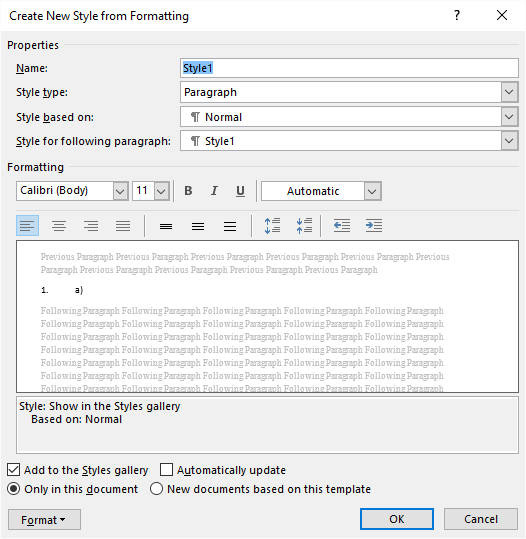
Figure 1. The Create New Style from Formatting dialog box.
At this point you can use your style anywhere you like within your document.
WordTips is your source for cost-effective Microsoft Word training. (Microsoft Word is the most popular word processing software in the world.) This tip (9627) applies to Microsoft Word 2007, 2010, 2013, 2016, 2019, Word in Microsoft 365, and 2021. You can find a version of this tip for the older menu interface of Word here: Understanding Styles.

Do More in Less Time! Are you ready to harness the full power of Word 2013 to create professional documents? In this comprehensive guide you'll learn the skills and techniques for efficiently building the documents you need for your professional and your personal life. Check out Word 2013 In Depth today!
Want to get your text away from the explicit formatting you applied, back to the underlying formatting? Here are a few ...
Discover MoreWord allows you to assign priority values to individual styles. This tip explains what those values mean, along with how ...
Discover MoreStyles are a powerful formatting tool for the text in your documents. Once you've created styles that describe how you ...
Discover MoreFREE SERVICE: Get tips like this every week in WordTips, a free productivity newsletter. Enter your address and click "Subscribe."
2024-02-22 18:17:16
Tomek
@Paul Stregevsky:
Linked styles can be used as you described, but personally, I don't like them. The reason is that I don't feel in control of how the linked styles are applied. When I have more time I will test this and give some examples when it does not work as expected (I had it happen before).
2024-02-20 09:40:49
Paul Stregevsky
A third type of text style is "Linked (paragraph and character)". By making a paragraph style Linked, you can take a paragraph style's character properties, such as font, point size, color, and kerning, and "paint" them onto a character string in a different-styled paragraph. For example, if "red Roman" is the only way that the Linked style "Quote" differs from the paragraph style Caption, you can select the end of your caption, apply the Quote style, and make that part of your caption red, as I've done in Figure 1. "Quote" will still work as a standalone paragraph style, complete with center alignment, left and right indents, generous line spacing, and other attributes. In this way, you can spare yourself the need to create a character style, such as Red Roman.
Note: When you use a Linked style as a character style in a heading or caption, you won't prevent the painted words from appearing in your table of contents or list of figures (Figure 1). To do that you'll need to insert a so-called Style Separator.
Tomek and Ken Endicott, feel free to correct or expand on what I've written or link to a comment you've made before. (see Figure 1 below)
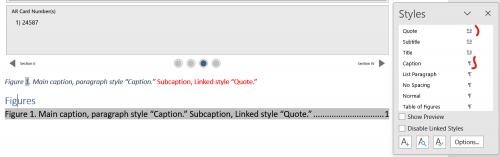
Figure 1.
2024-02-19 18:07:59
@GFIN Sunny:
There are two places where styles are kept: in templates and in the documents. One of the templates is the Normal template used by Word to create new documents if you don't specify a custom template. Its location is %appdata%\Microsoft\Templates\
%appdata% is a variable that keeps the location of your application data..
When you modify or create a style, you can select whether you want the style to be applied to a document you are currently editing, or all future documents based on the template assigned to it. You don't really need to export the custom styles. You just need to keep a backup copy of a document or template that has your custom styles. If it is a template, make sure its backup is not named Normal (that causes some problems when trying to use it).
If you lost your custom styles you can restore them from such backup document or template or possibly from ***any old document*** that used them. You can convert such document into template and move it to your custom templates location or even use the restored template to replace your current Normal template. How to do the latter is a bit more involved, but if you need help send me a message with your particular scenario, and I will try to help you.
2024-02-19 01:58:52
GFIN Sunny
Does it make sense to export custom styles because I think mine was lost somehow (Updates or file system issue?)
Got a version of Word that uses the ribbon interface (Word 2007 or later)? This site is for you! If you use an earlier version of Word, visit our WordTips site focusing on the menu interface.
Visit the WordTips channel on YouTube

FREE SERVICE: Get tips like this every week in WordTips, a free productivity newsletter. Enter your address and click "Subscribe."
Copyright © 2024 Sharon Parq Associates, Inc.
 Please Note:
This article is written for users of the following Microsoft Word versions: 2007, 2010, 2013, 2016, 2019, Word in Microsoft 365, and 2021. If you are using an earlier version (Word 2003 or earlier), this tip may not work for you. For a version of this tip written specifically for earlier versions of Word, click here:
Please Note:
This article is written for users of the following Microsoft Word versions: 2007, 2010, 2013, 2016, 2019, Word in Microsoft 365, and 2021. If you are using an earlier version (Word 2003 or earlier), this tip may not work for you. For a version of this tip written specifically for earlier versions of Word, click here:
Comments