Please Note: This article is written for users of the following Microsoft Word versions: 2007, 2010, 2013, 2016, 2019, and Word in Microsoft 365. If you are using an earlier version (Word 2003 or earlier), this tip may not work for you. For a version of this tip written specifically for earlier versions of Word, click here: Understanding Object Anchors.
Written by Allen Wyatt (last updated December 7, 2021)
This tip applies to Word 2007, 2010, 2013, 2016, 2019, and Word in Microsoft 365
Objects can be placed in your document in two ways: either inline or floating. Inline objects are those that reside on the same layer as your text and are positioned within the stream of text that surrounds the object. Floating objects are those that are placed on a layer over the text. The thing that indicates essentially where a floating object is located in relation to the text in your document is referred to as an object anchor.
If you click an object so that it is selected, and if the object is truly a floating object, and if you are looking at the document in Print Layout view, then you can possibly see the object anchor on the screen. (That's a lot of "ifs," I know.) (See Figure 1.)
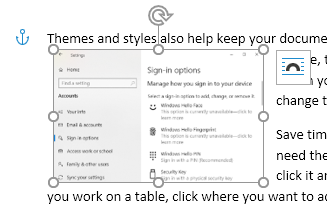
Figure 1. An object anchor shows up as a small boat anchor.
I say "possibly" because object anchors are not always visible. In other words, you can control the display of the anchors. (More on that in a moment.) If you select a graphic object in your document and you see a boat-anchor icon appear in the left margin of the document, then you know you have the display of object anchors enabled. If you select an inline object, then there is no object anchor to see. Why? Because inline objects are anchored to the place within the text where they were inserted. In other words, they are treated like any other character in the text itself.
If you want, you can modify whether Word displays object anchors or not. You can change this setting by following these steps:
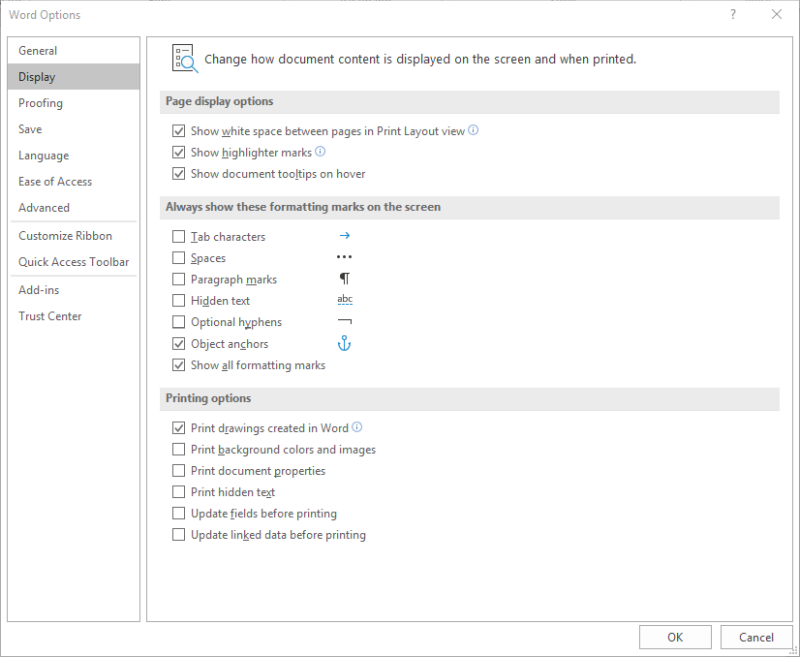
Figure 2. The Display options of the Word Options dialog box.
Object anchors are used to specify the paragraph with which an object is associated. Why is that important? Because it can affect the positioning of the object within the document. In order to see how this works, you need to display the settings that allow you to position the object. Follow these steps if you are using Word 2007 or Word 2010:
If you are using Word 2013 or a later version, then the steps are a bit different because Word uses different Context menus:
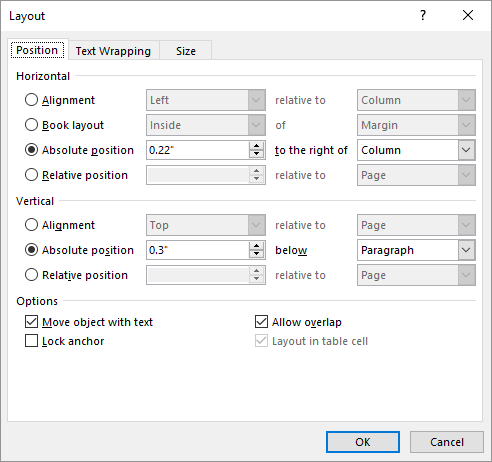
Figure 3. The Position tab of the Layout dialog box.
Note that these steps will only work if you are working with a floating object; again, inline objects don't allow you to adjust their positioning relative to an object anchor. (Object anchors only exist for floating objects.)
Regardless of the version of Word you are using, the dialog box you see includes a plethora of controls that specify the positioning of the picture. One thing you can set is the vertical position of the picture in relation to the paragraph to which it is anchored. Thus, seeing the object anchor helps you to understand the positioning of the picture.
In addition, the Advanced Layout dialog box (Word 2007 and Word 2010) and the Layout dialog box (later versions of Word) allow you to select a check box named Lock Anchor. This option causes Word to paginate your document so that the object (the picture) is always on the same page as the object anchor. This is the best way to ensure that a floating picture is on the same page as the paragraph that describes what is in the picture.
WordTips is your source for cost-effective Microsoft Word training. (Microsoft Word is the most popular word processing software in the world.) This tip (8229) applies to Microsoft Word 2007, 2010, 2013, 2016, 2019, and Word in Microsoft 365. You can find a version of this tip for the older menu interface of Word here: Understanding Object Anchors.
The First and Last Word on Word! Bestselling For Dummies author Dan Gookin puts his usual fun and friendly candor back to work to show you how to navigate Word 2013. Spend more time working and less time trying to figure it all out! Check out Word 2013 For Dummies today!
Understanding how Word handles wrapping text around a graphic or other object is critical to getting the best page layout ...
Discover MoreDo you like to add pictures to your document just by dragging and dropping? What are you to do if it appears the ...
Discover MoreInsert a graphic into a document and you expect to be able to see it. What do you do if it isn't displayed, however? Here ...
Discover MoreFREE SERVICE: Get tips like this every week in WordTips, a free productivity newsletter. Enter your address and click "Subscribe."
2023-11-29 18:13:28
Steve
What about Anchors Word Shapes?
2022-06-02 05:22:41
Allen,
I am doing a lot of learning from your material. I am actively attempting to make properly formatted documents and Googling a lot of subjects. It seems I land on your entries often, and that your comments are the ones that make most sense to me.
I really appreciate your work, it is taking my work to a whole new level.
Oddly enough, I am making a guidebook for new employees. I don't cover the finite material, just a pointer based book of procedures and policies best to observe.
Anyways, if you don't mind I would like to put a link to your site on my acknowledgements page.
2021-12-10 07:13:15
Ken Endacott
Since a shape can be dragged and nudged there is not much use for the absolute position settings. However, alignment and relative position settings are very useful for positioning images in headers and footers when the document has both portrait and landscape pages. For example if center alignment is set then the image will always be in the center no matter what the page orientation is. A gotcha is that if subsequently the shape is dragged or nudged it will revert the positioning to absolute and the layout in the other page orientation is cactus.
A shape is nudged with the arrow keys, the shape must have been selected by clicking on the shape’s border. If the anchor formatting is selected in Options then the anchor will display, if not then it can be hard to determine if the shape is properly selected. On my computer the nudge is 0.75 points but it is supposed to vary with the pixel density of the screen. CTRL + arrow key is supposed to change the distance moved, on my computer it gives the same movement.
2021-12-10 00:40:20
Dan,
Before you continue reading this comment, please make sure you understand what Anchor Icon is and what Anchor Point is, how to find them and what is the difference between them. If not sure, read earlier comments to this tip, particularly Ken Endacott"s and mine.
The check boxes you asked about control behaviour of the floating shapes (as defined in Ken's last comment). Starting with the easiest:
Allow Overlap - if ***unchecked***, it will prevent the specific shape partially or completely hiding behind or obscuring another shape. In current version of Word (MS365), this setting is applied for each shape, but in older versions, I believe, it was applied as global to all shapes. If you move one shape and it starts to interfere with another and at least one of them has this option unchecked, one of them will be moved by Word to prevent overlap.
Lock Anchor: If it is not checked, the user may drag the anchor to another location, which will generally drag the Anchor point to a new position as well. In such case the position of the shape will not change, unless the anchor is dragged to another page, in which case the shape will move to that new page, in the same relative position as it was on the original page. If you drag a shape and the Lock Anchor is unchecked, the Anchor Icon and the Anchor Point can move to a different paragraph and even to a different page.
If Lock Anchor is checked, it will prevent both Anchor Icon and Anchor Point from being moved. The user can still move the shape, but only within the page. Any attempt to move it to another page will move the shape the same relative position as the selected one on new page, but still on the original page. This may be quite confusing. This setting is useful if you want to anchor a shape to a paragraph that is not close to the shape. Remember, they have to be on the same page though.
Move object with text: If this option is checked, editing (adding or removing) text or whole paragraphs may move the Anchor Point, which in turn will move the shape. This will happen only if the changes were made to the portion of the document before the Anchor Point, but not necessarily before the Anchor Icon! Also, very small changes may not actually move the anchor point. Also, if the Anchor Point moves to another page, the associated shape will jump to that page too. Its exact location will depend on how its position was originally defined (relative to page, margin, paragraph, line, character, etc.) and may be quite confusing.
If Move object with text is unchecked, the position of the shape will be fixed on the page if the text is edited. The user can still drag the shape to another location on this or another page, subject to other two check boxes' restrictions. However, if the Anchor Point moves with the text to a different page, the shape will jump to that page too, retaining its position relative to the page. That's why it is also called "Fix position on (a) page".
A curiosity: If Move object with text is unchecked, it is possible to drag the shape out of page, so it will become invisible! It will still be there and can be selected and dragged back to the page. You just have to know it is there. To check what shapes exist in the document, just display the Selection Pane for the proper type of the object (they are different for pictures and shapes and other objects).
2021-12-09 02:14:28
Ken Endacott
Dan,
The following should help you understand the Layout dialog box. It applies to floating shapes where “shape” is the generic name for shapes, pictures images, OLEs etc.
The Position tab enables the fine positioning of the shape and its anchor. In most cases dragging the shape is satisfactory but sometimes specifying the position is useful. For example to get exact alignment of multiple shapes, or to centre the shape on the page even if the page size or orientation changes.
The shape’s anchor by default is attached to a paragraph and the shape moves with the paragraph. However it can be attached to other things such as the page in which case it will always be in the same position on the page no matter what changes to text occur.
A shape position is offset from its anchor. When a shape is dragged these values automatically change.
The Alignment options sets the shape’s position to left, centre or right and top middle or bottom relative to an item such as page margin.. If the shape is subsequently dragged then the position settings are changed to absolute with appropriate offsets.
The Text Wrapping tab sets the type, for example behind or in front of the text. WARNING: the “In line with text” option converts the shape from floating to in-line and the position may jump around. Attempting to recover the position by converting back to a floating shape only makes things worse. This is a frequent mistake made by neophyte users. The correct method is to use Undo.
All of the shape options are accessible in VBA which means that novel macros can be written. For example a macro that ensures all shapes in a document are uniformly sized and positioned.
2021-12-07 05:44:43
Dan
Would you mind explaining the Options checkboxes?
What do they do, and what will be their effect?
Thank you
2021-11-26 13:24:03
Tomek
@Ken,
I did try your earlier code and that gave me some understanding on how the individual shapes can be selected and referred to. Time permitting I will try your new code too and get back here with any observations.
BTW: It bothered me that the anchor point is hiding between two characters of text but cannot be seen and does not add to the length. By going back to the older document format (.doc) and opening the document in a text editor, I found that that character has the ASCII code of 08, which in old days was a backspace. I tried to do the same for newer .docx file (changing it to .zip and opening various .xml parts hidden therein). In place of the Chr(08) there is a lot of xml code, which by my guess is describing the object. But I don't know XML so couldn't figure out what it means.
2021-11-26 03:09:51
Ken Endacott
I got off my backside, dug out some code I wrote seven years ago and rewrote the NextShape macro to step through shapes in a forward or reverse direction.
The code that steps through shapes that have the same anchor point was the result of some inspired trial and error and I still don’t understand why it works.
Sub PreviousShape()
StepThroughShapes (wdGoToPrevious)
End Sub
Sub NextShape()
StepThroughShapes (wdGoToNext)
End Sub
Sub StepThroughShapes(Dirn As Long)
Dim aRange As Range
Dim j As Long
Dim k As Long
Set aRange = Selection.Range
aRange.MoveStart unit:=wdCharacter, Count:=-1
If aRange.ShapeRange.Count > 0 Then
j = aRange.ShapeRange.Count ' anchor number of current shape
aRange.MoveEnd unit:=wdCharacter, Count:=1
k = aRange.ShapeRange.Count ' total number of shapes at anchor
If j < k Then
aRange.ShapeRange(j + 1).Select
Exit Sub
End If
End If
Selection.GoTo What:=wdGoToGraphic, Which:=Dirn, Count:=1, Name:=""
Set aRange = Selection.Range
aRange.MoveEnd unit:=wdCharacter, Count:=1
If aRange.ShapeRange.Count > 0 Then
aRange.ShapeRange(1).Select
Else
aRange.InlineShapes(1).Select
End If
End Sub
2021-11-24 12:59:56
Tomek
Paul,
I am just a retired research and ***analytical*** chemist who likes puzzles and computers.
2021-11-24 10:17:46
Paul Stregevsky
Tomek,
With your long tip on finding a figure anchor (2021-11-20 23:23:24), you've joined Ken in the pantheon of most valuable contributors. I don't know what impresses me most: Your exhaustive research; your analytical, reader-focused write-up; or your flawless editing. Clearly, you have a first-rate mind.
2021-11-23 14:04:18
Tomek
Thanks Ken.
2021-11-23 10:54:42
Ken Endacott
Tomek,
Here is a simple macro that will step through shapes in the document whether they are in-line or floating. A lot more code is needed to correctly step through multiple shapes anchored at the same place.
Sub NextShape()
Dim aRange As Range
Selection.GoTo What:=wdGoToGraphic, Which:=wdGoToNext, Count:=1, Name:=""
Set aRange = Selection.Range
aRange.MoveEnd unit:=wdCharacter, Count:=1
If aRange.ShapeRange.Count > 0 Then
aRange.ShapeRange(1).Select
Else
aRange.InlineShapes(1).Select
End If
End Sub
2021-11-22 12:17:06
Ken,
Your suggestion of Go To Graphic actually is more useful than you give it credit for. It moves the cursor to where the anchor point is (not the anchor icon). The anchor points are not always before the first character of a paragraph. Up to now I searched for the anchor points by narrowing text selections until I narrowed it to just two characters. With your suggestion I can just Go To Graphic (or repeat it with Shift+F4) and the cursor will land between the two characters exactly where the anchor point is. It seems to work with all types of anchoring: paragraph, line, character, etc. and helps when the anchor point is not near the anchor icon.
Thanks again.
BTW: If you select the two characters, which will cause the graphic to be selected as well, the Len(Selection) returns 2, even though it is obviously more than just two characters.
2021-11-22 05:22:31
Ken Endacott
Tomek,
The Go To Graphic is not very useful because it puts the cursor at the anchor and does not select the shape. The solution is to use a macro that steps through shapes in a document rather than stepping through anchors.
The macro advances the anchor selection by one character so that the resultant selection then contains the anchor(s) and the first character of the paragraph – it is not necessary to include the previous character. Further VBA code then determines how many shapes are in the selection and then selects the appropriate one. The macro is quite complex as it needs to handle next and previous movement, in-line shapes and different types of floating shapes. If there are multiple anchors at the same place, it is necessary determine which is the relevant shape.
2021-11-21 09:52:36
Tomek
Thanks Ken,
That find and replace behaviour is great piece of information, would be even better if there was a find code for the object anchor.
2021-11-21 06:45:18
Ken Endacott
Tomek,
You are right about the anchor being between the pilcrow at the end of the previous paragraph and the first character of the anchor paragraph. You can’t see the anchor “character” but Find and Replace can. For example a very common editing requirement is to replace all instances of two blank lines between text paragraphs by one blank line. The find code is ^p^p^p and the replacement code is ^p^p If one of the blank paragraphs is an anchor to a shape then Find and Replace won’t work. This is just as well otherwise you could inadvertently delete the shape.
The Go To Graphic command (Word 2016 and above) will place the cursor at the anchor of the next (or previous) shape irrespective of whether is in-line or floating. For in-line shapes this will be after the character preceding the shape. Floating shapes can be displaced on the page and you may need to hunt around to find the shape. Furthermore several shapes can be anchored to the one paragraph resulting in several invisible anchor “characters”.
2021-11-20 23:36:09
Tomek
Sorry, I was planning to post my previous comment in another tip. I inadvertently left the reference to Ken's comment as if it was to a different tip, but it is actually posted in this tip.
2021-11-20 23:23:24
Tomek
This comment is for extreme geeks only and discusses anchoring of the floating images (or other objects) in Word. Understanding this may help you figuring out why floating objects behave the way they do when you do other things in Word (like changing or selecting text). If you are a lesser geek or not a geek at all, you may want to jump to the last paragraph of this comment for my advice on how to treat images and other objects without worrying too much with the technical stuff.
First topic: where does the anchor point hide (hint: I do not mean the small blue anchor icon).
In his tip Allen stated:
“Now, here's the interesting part: If you drag and move the image so that its anchor moves to a different paragraph, that image becomes anchored to that different paragraph. In the process, the actual anchor point is moved to the paragraph mark (the pilcrow character) at the end of the paragraph. (The visible blue anchor doesn't move to the paragraph mark; it still appears to the upper left of the paragraph. However, the actual point at which the image is anchored is moved to the paragraph mark.) This means that after moving the image, you could select all of the text in the paragraph with the exception of the paragraph mark, and the image anchored to that paragraph won't be selected.”
In my testing in Word from MS365 under Win10, I found the highlighted part of this statement to be not accurate.
Let’s assume that the floating image is anchored to a paragraph, and its position is defined horizontally as absolute to the right of column, and vertically absolute below paragraph. Also, the whole paragraph to which the object is anchored all fits on one page.
In this scenario, the anchor point seems to hide just before the first character of that paragraph, not in the paragraph mark (pilcrow). As proof of this:
• If you select just the pilcrow mark at the end of the paragraph, the object does not get selected.
• The object gets selected if you select both the first character of the paragraph and the pilcrow mark. This essentially selects the whole paragraph, including any hidden marks within it. If you deselect any of the two, the object will not be selected; however,
• If you select the pilcrow character from the previous paragraph and the first character of the paragraph to which the object is anchored, the object will be selected. This indicates that the anchor point must be somewhere within this selection.
Why is this important? Because if you insert text before this anchor point (adding extra lines of text to the earlier paragraphs, or adding whole paragraphs), the object will move (provided its option “Move object with text” is checked). Adding text to the paragraph with anchor, even before the existing first visible character, will not cause the object to move, even if option “Move object with text” is checked. The move/not move behavior also applies to deleting text.
Dragging the anchor icon to another paragraph does not move the object relative to the page. It results only in adjustment to the position definition for the object. The anchor point will now be hiding before the first character of the paragraph, to which the anchor icon was moved. The object will not move, unless the anchor icon is moved to another page, where the object will be placed in the same position relative to the page.
The anchor icon must be on the same page as the anchored object. Which bring us to consider a slightly different scenario: what if a paragraph starts on one page, and ends a few pages after? There will be a page where there is no first line of a paragraph nor an ending pilcrow. If there is a floating object on such page, the anchor icon will be next to the first line of text on that page, but the anchor point may be located anywhere on this page!!!
To locate it, start selecting portions of text on that page. Once you see the object in question being highlighted, start narrowing your selection. The goal is to find two consecutive characters, which when selected will cause the object to be selected (highlighted) too. The anchor point must be hiding in between these two characters.
The location of this anchor point depends among other things on how the object was placed on the page. It could have been converted from an in-line image or shape, it could have been inserted from an external source (file, internet, etc.) or copied and pasted from another program, screenshot, or document, or even from another location in the same document. Afterwards, the anchor point can get moved by editing text that is earlier in the document. If the object is moved to another page, the anchor point and the anchor icon will move along and may become associated with one of the paragraphs on the new page.
To complicate the matters even more, the objects' positions can be defined in relation to page, margins, columns, lines, and even characters. In addition to that, they may be set to move with text or stay fixed on a page. Ken Endacott posted a good summary on object anchoring in the tip:
https://wordribbon.tips.net/T008229_Understanding_Object_Anchors.html
check Ken’s comment posted 2015-06-03 08:38:40, and do not forget to read the tip itself.
So, what is the practical learning from all this geeky information. Learning all the permutations of various object anchoring modes and position settings will take a lot of time for no significant benefit, unless, like me, you enjoy solving all kinds of puzzles and have time for it. My advice is as follows (KISS): When creating a document, you can place objects (images et al.) at any locations that seem logical, but do not spend a lot of time positioning them (this will likely be messed up anyway). In most cases in-line images are not the best unless you place them in their own paragraph. Only after you finish editing and re-editing the text and other contents of your documents (e.g., tables), focus on moving the objects to the precise locations you want and selecting the type of text wrapping around them. You also have to decide whether you want the particular object to move with the text or stay fixed on the page. In most cases you will want the objects anchored to paragraphs and positioned vertically in relation to paragraphs as well. Remember that you can move the objects almost anywhere on the page. The object anchor may move to another paragraph, but it may not matter. If it does matter you can lock the anchor and keep the object anchored to a paragraph that is not even near the new position of the object (as long as it is on the same page).
I hope this helps.
2021-11-20 06:28:37
Paul Stregevsky
Larry Schwarz, the ability to maintain text wrapping while zooming depends on your browser settings. See if your phone browser has a "desktop" mode.
2021-11-19 06:08:00
Is there a way so that when I view your tips on a cell phone I can enlarge my view with the text wrapping lines as it gets larger?
2021-11-18 21:30:33
Tomek
@Ravi:
I just saw your comment today, so it may be too late but:
When you select an object (picture, image, shape, or any other) a new tab appears in the Ribbon: "Picture Format". In the Arrange group it has tools to bring the selected object F orward, to Front, or in Front of Text, and analogous tools for moving back. This changes the order of layers (or what you call ZOrder), for the objects. There is also a button for Selection Pane. In there you can hide or show objects, and also change their order (by dragging or using one of two small arrows to move the selected object down or up the list.
Mind you, that if you prevent objects from overlapping, it does not matter which is in front or back.
2021-03-24 01:20:27
Ravi Prakash
Hi Allen,
I'm developing a plugin convert Icons/Pictures to floating object. I'm inserting a white rectangle on top of all pages in the Word document. I would like to raise few icons somehow so that i can manipulate the ZOrder of the those icons ot bring them in front of the rectangle. . While doing this, I do not want to disturb other text/icons around it.
For eg: AB C D E F
If C and E are icons of my interest and ABDF are text/icons. I want C and E to rise above their visual location without disturbing any paragraphs or anything in the Word file. I have tried using ConvertToShape function, but that doesn't help me as it disturbs everything around it.
2020-09-01 16:58:21
Hello Alan,
Thank you. This is a great site, and much more user-friendly than Microsoft's own so-called help. Every time MS ask the question "was this helpful?", the answer is always NO !
I have a problem with formatting. I've been using a computer since before Windows, when all you had was a blank screen and a C:\ Prompt on a 486 computer. I've grown up with Windows from 3.11 to Windows 10, and every time they improve it, they make it harder to use. This has really beaten me.
I'm getting huge blank spaces between my paragraphs. Basically, the page is justifying itself vertically. And whenever I try to insert a picture or text box, it gets worse. I've tried everything I know to fix it, and even cutting and pasting as Text Only doesn't cure it (see Figure 1 below)
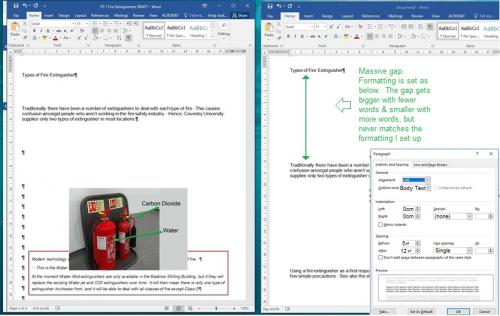
Figure 1. Formatting spaces
2020-04-01 05:25:59
Ken Endacott
Right click on the image, select Wrap Text and the wrapping type will be highlighted. The” In Line with Text” type is just that, all other types are floating and can be dragged around the page. If the image is floating and you click “In Line with Text” then it will be converted to In Line and vice versa.
The problem is that when converted, the image may be moved to a new position to comply with the new wrapping type. Clicking the original type in order to convert back to the previous type may not move the image back to the original position. This is where many people get frustrated and click backwards and forwards thus compounding the problem. If you want to get back to where you were then use undo.
By default Word gives inserted pictures "in line with text" wrapping. In contrast, inserted shapes are given the “In Front of Text” wrapping and are hence are floating.
2020-03-31 12:49:08
MIchael Armstrong
[cynic mode]The general rule seems to be that no matter if there's an anchor or not, you can't put the image where you want it, and if you do, it will be moved somewhere else anyyway.[/cynic mode]
Seriously, what determines if an image is floating or inline, and can you change one to the other? Seems to me, every time I paste an image, it floats.
2020-03-30 21:15:23
Jenelle
I am going ABSOLUTELY crazy as Word or something has arbitrarily broken Tables into an anchored frame for any number of table rows (all, the header row, some unknown row(s) in the table body. A single table may have been split into 5 tables, some with one row--for no particular reason, not even someone editing the table!
I have created a shortcut to the Remove Anchor, but the same document that I saved yesterday has new broken tables with anchors in them.
My lament: I see no way to search for an anchor. They "appear" if I select an area of text that has one, and this ONLY when there is the obvious problem of the anchor making the table run off the page or run together with a Heading paragraph.
Is there a SAR macro for anchors (in tables, that's where this virus seems to reside).
2019-12-24 13:16:23
Paul in the Heights
Remarkably clear and complete. So much better than poorly scripted or unscripted YouTube videos. Thanks very much.
2019-08-05 03:04:54
Phil
Word 'Options' is called 'preferences' on the Mac. Took me a while...
2019-01-25 08:37:07
ABHILASH JHA
Hi i have word file with anchor i am unable to copy content from anchor file pls help
2018-06-15 14:14:31
BA
I have seen the word "object" used in different contexts. Is an image an "object"? My understanding of the word "object" is that is a category of things in Word (and the other programs) that share a certain group of properties.
2017-02-09 08:38:53
Jim Treharne
I have several figures in a Word Document (2016). Because they are fairly large (3in*5.5in) - I often get several lines of blank space on the previous page. While I would like the figure to be in or near paragraph that discusses it - I also prefer to eliminate all the extra space. What is best technique to do that?
On related note - I had issue with some captions moving so I embedded both caption and figure in a one cell table. That seems to work - not sure if best way.
2017-01-13 19:47:00
shes
Using Word 2013, if multiple figures are floating over multiple pages, extra white space at end of page sometimes is present. Moving the figures around or shrinking them sometimes can fix this problem. But sometimes the white space at the end of a page is not eliminated.
2016-10-13 02:54:18
Qingyong Wu
i've got the same question as Robin Brooks :
"I am editing a large document of several hundred pages with many figures. Is it possible for the figures to float to the next space that is large enough even if this is on a subsequent page with text moving to fill the too-small space on the page where the figures anchor is located?"
inline graphs always suffer from this problem: if the remainning space of a page is not enough for a graph, the graph will appear on the top of the next page, leaving a large blank space on the former page. (this could be fixed by adjusting the size of the graph, however, sometimes the size of the graph is restricted by journals,publishers, etc)
it will be nice if Word automaticaly fill this blank space with text following.
2016-08-23 08:02:51
Ken Endacott
Change the text wrapping option from 'In Line with Text' to one of the floating options then you can drag the object to where you want it. These options are in the Text Wrapping tab of the Layout dialog box.
2016-08-22 16:05:57
Emmi
How do you turn it off? I'm having a lot of issues with it. I just want to be able to move it anywhere I want.
2016-08-17 05:32:58
Ken Endacott
It all depends on whether you picture you are copying from is inline or floating. If it is inline then it will paste at the cursor position. If it is floating then after pasting it will be in the same relative position on the page but will be anchored to the paragraph that the cursor is in.
Right click on the picture and select Wrap Text. The highlighted item is the image type.
Textboxes and inserted shapes are always floating and when you paste them into a new page you need to drag them to the position that you want.
2016-08-16 16:55:31
I would like to know how one can paste a picture that was copied from a certain page in a document at the cursor position of another page in the same document. Until now, when I paste a picture (or textbox) it always appears at the same position as it was on the page it was copied from (which is mostly not the desired new position (=cursor position)).
I would appreciate it a lot if someone could explain me how to manage this or otherwise refer to a tip that deals with this topic.
2015-11-04 01:32:13
ash
I need to copy paste many images in word
I am using MS word 2010.
They always start overlapping on each other by default.
how do i stop overlapping images?
2015-11-01 18:06:13
Derek
I forgot to mention that I'm using Word 2013.
2015-11-01 18:04:46
Derek
I converted a large Adobe file to Word 13 for the purpose of editing it.
The Word file has many "underlines" that are attached to texts that I want to delete or modify.
How do I get rid of all of these anchored underlines? They are driving me crazy!
2015-08-26 17:41:11
Linda Wallers
I found this tip useful. I was not looking for how to kill the anchor, but rather how to fix a text box (Newsletter officer/meeting notices) on a particular page - apparently not doable in WORD. It is too bad that others bad mouth attempts to help users.
2015-08-16 14:09:08
Robin Brooks
I am editing a large document of several hundred pages with many figures. Is it possible for the figures to float to the next space that is large enough even if this is on a subsequent page with text moving to fill the too-small space on the page where the figures anchor is located?
2015-07-28 18:22:11
Jonathan
I am trying to layout a book with figures in the outside margins. It is very important to me to have the top each figure align to the line where the anchor is.
This works just fine, except when the anchor is near the bottom of the page, then my figures float into the vertical margins.
I can keep from having my figures overlap, but how to keep them from going into the margins?
Ideally if the bottom of the figure is below the text line, it would align it to the bottom margin rather than the line, without my having to manually change it.
Can that be done?
2015-07-02 07:27:15
Ken Endacott
Tom,
Google "Delete all images from Word"
The best method is to use Find & Replace with the special Find "Graphic"
2015-07-01 18:16:33
tom roberts
Hi - does anyone know if it's possible to select all images in a document and remove them at once? my images are all floating below the text. i have to hit SELECT, SELECT OBJECTS and delete them individually. really a waste of time. thanks. tom
2015-06-30 00:31:21
Kristin C
Hi there,
Thanks for the helpful article. I was wondering if it helps to align to margin rather than paragraph and column?
Thanks, Kristin
2015-06-16 07:41:08
Harry Audus
Of course! Thanks again, Ken. The combination of your advice and my own playing around resolved the problem. I'm no more enamoured of the anchor and its mysterious behaviour, however.
2015-06-11 05:55:30
Ken Endacott
I realise that there is an very easy way to solve Harry's problem of aligning an in-line image.
1. Select the image and the space alongside.
2. Right click the selection and select font.
3. In the advanced tab click the Position drop down box and select Lowered
4. Enter the number of points to drop down.
2015-06-05 05:36:23
Harry
Thanks again, Ken. I will try out your method and download the tool.
2015-06-04 20:32:39
Ken Endacott
A floating image is word wrapped and cannot be inserted into the middle of a word. A work around is to break the word into two with a space and adjust the image's left and right text spacing.
2015-06-04 20:04:24
Ken Endacott
You can get the effect that you want by:
1. Convert the image from in-line to floating
2. Set wrapping style to Text around Shape
3. Set horizontal anchoring to character. Make sure that the vertical anchoring is to paragraph. Drag the anchor symbol to the character you want to anchor to.
4. Set the text spacing left and right to 1 point each.
5. Drag the image so that it is positioned where you want it relative to the anchor character. Because of the fine moves, probably best done at a zoom of 200%.
With Word's menu structure, all this becomes very tedious. However there is a free tool that makes it easy. See:
http://www.editordie.com.au/editorkae/shapes.html
2015-06-04 06:42:36
Harry
Thanks, Ken. The way an image and its anchor are positioned is clearly rather dysfunctional, e.g. "the anchor moves in some mysterious fashion". I'm usually content to align images in line with text, but I recently wanted to put a very small image in a sentence. I used "in line with text", which located the image in the right place horizontally, but I wasn't happy with the vertical placement. The problem was that, with "in line with text", the bottom edge of the image is always aligned with the the text line. I really wanted to move the image down a bit while keeping it in the same place in the sentence. There doesn't seem to be any way to do this.
Any ideas?
2015-06-03 08:38:40
Ken Endacott
The anchor symbol does not tell much about a shape's anchoring. For that you need to right click the shape and select More Layout Options. Understanding anchoring helps explain why shapes move around when changes are made to the document. As can happen, two shapes on a page may move differently when document changes are made, because they have different anchoring setups
Anyway, here are the anchoring options and where the anchor symbol is positioned.
Horizontal anchor point:
Page. The shape's offset is from the left hand paper edge. The anchor symbol is in the left hand margin.
Margin. Offset from the left hand margin. If the margin is changed then the shape moves with the margin. The anchor symbol is in the left hand margin.
Column. Offset from the column boundary. The anchor symbol is in the white space to the left of the column. The offset can place the shape in another column to the anchor column.
Character. Offset from a particular character with the anchor symbol at that character. Note that this does not give the same result as an in-line shape.
Vertical anchor point:
Paragraph. Vertically offset from the first line of a paragraph. If that paragraph moves down then the shape moves with it. Dragging the shape up or down may cause the anchor to switch to another paragraph unless the anchor is locked.
Line. Offset from a particular line in a paragraph. The anchor symbol is adjacent to that line. If text is added to or removed from the paragraph before that line then the anchor moves in some mysterious fashion and the shape moves with it.
Page. Offset from the top edge of the paper. However the anchor symbol is at the top of the nearest paragraph. If the paragraphs move down the position of the shape remains at the same place on the page but the anchor symbol may switch to another (nearest) paragraph even though the offset is still to the page.
Margin. Similar to Page except the offset is from the top margin. The shape will move vertically if the top margin is moved.
2015-06-03 00:08:59
Harry
Given that the object anchor is fixed at the start of a paragraph, what then is the difference between "relative to paragraph" and "relative to character" (assuming that the word "character" means the anchor symbol)?
More generally, what are the definitions of all these things that the object can be aligned to or relative to (i.e. margin, page, left margin, character, etc)?
2015-05-20 08:13:54
Ken Endacott
rpederso
If the object is anchored to a paragraph then with Lock anchor off, the offsets from the anchor are automatically adjusted when the object is dragged vertically until it is moved close to the next paragraph at which stage the anchor changes to the next paragraph and offsets are re-adjusted.
Th same applies to anchoring to a line. Anchoring to a page or margin operates in a similar way.
If Lock anchor is on then the anchor is unchanged no matter how far the object is dragged and you cannot drag the anchor itself.
Lock anchor is most useful where there is a drawing comprising several objects and it is desirable that they all remain anchored to the same paragraph or line.
2015-05-19 12:46:39
Paul Bouscaren
The most helpful part of this tip is what was not stated (or maybe I missed it): Once the anchor is visible, you can then 'kedge' the document to where you want it. Now, 'kedge' is a nautical term which means to move the anchor in order to reposition the vessel...
2015-05-18 02:04:51
E-Sync Security Solutions is one of the foremost organizations that deal with all type of Electronic Security Systems thus, offering excellent customer support. Emerged as an electronic security alarm systems integrator, we offers a wide range of services including engineering, project management, installation, repair, training and support services of security alarm systems.
2015-05-12 13:31:00
BevSDC
Very helpful article. Selecting "Lock anchor" while using Vertical Absolute position below Page allowed the text box to appear at a specific position on the last page.
2015-04-30 15:39:35
rpederso
Just to know what "Lock Anchor" does was helpful to me. No place to be rude, Stephen and Pat.
2015-04-30 04:41:39
Edina
Well this helped me :) Thank you!
2015-04-22 14:29:01
awyatt
Thanks for the kind words, Cliff.
It is hard to help people like Stephen when they give no idea of what they expected. "Microsoft jargon" is not a bad thing if one learns from it. It is, after all, Microsoft's program, and they can use whatever "jargon" they like to describe how their program works. I write with the intent of helping people understand how the pieces and parts of that program work.
Pat: Object anchors don't affect layout at all. As the tip points out, they only indicate the paragraph to which a floating object is "attached" in your document. If you want to get rid of them (as you imply), the only way to do so is to either delete your floating objects or convert them to inline objects.
-Allen
2015-04-22 13:59:38
Cliff Pitt
Comments like "this tip is totally useless" or "Duh!" are not only rude they are discouraging to the writer. Stephen and PAT, I'm sure you hear those comments about your work often, but there's no reason to take it out on someone who is trying to help you.
2015-04-17 13:02:02
I agree. Not much use here. The reason why most people check this page out is to GET RID OF THE DARN THINGS and find out how the results impact your layout. Duh! (IMO)
2015-03-13 13:26:18
Stephen Mosley
This tip is totally useless. More Microsoft jargon and no real help. A waste of time.
2014-07-21 12:26:16
Marks PC Solution
When I choose Print Layout View in Office 2013, every line shows a border. I mean horizontal lines.
Is there any way to get rid of it please?
2014-07-15 05:05:42
K.Vee.Shanker.
I've been using a lot of screenshots in our company's docs. I want to change the options in Layout Window some times, as I position small icon images in sentences. Then, it would be helpful to have the option 'Allow Overlap' be deselected for inline position to avoid the overlap between icon and the text around it. Word doesn't allow this. I change the position option to another, say 'Square' or 'Tight' to deselect it. But, Word reselects the option once I go back to Inline. Is there a way around?
Got a version of Word that uses the ribbon interface (Word 2007 or later)? This site is for you! If you use an earlier version of Word, visit our WordTips site focusing on the menu interface.
Visit the WordTips channel on YouTube

FREE SERVICE: Get tips like this every week in WordTips, a free productivity newsletter. Enter your address and click "Subscribe."
Copyright © 2024 Sharon Parq Associates, Inc.
 Please Note:
This article is written for users of the following Microsoft Word versions: 2007, 2010, 2013, 2016, 2019, and Word in Microsoft 365. If you are using an earlier version (Word 2003 or earlier), this tip may not work for you. For a version of this tip written specifically for earlier versions of Word, click here:
Please Note:
This article is written for users of the following Microsoft Word versions: 2007, 2010, 2013, 2016, 2019, and Word in Microsoft 365. If you are using an earlier version (Word 2003 or earlier), this tip may not work for you. For a version of this tip written specifically for earlier versions of Word, click here:
Comments